L2VPN in VMC on AWS

I generally try to write about what I am working on at any given time. This month has involved working on connecting applications which have a hard requirement to span Layer 2 from the VMware Cloud on AWS environment to a customers on premises datacenter. While I normally try to bring sanity to these environments and push for a refactoring/replatforming exercise, for may of the teams I assist, this is just not an option, or is a long term project. Part of the value of VMC on AWS is the flexibility of the solution while bringing environments closer to cloud native resources.

Design requirements

For this particular use case we were working to connect a single non-x86 system running a database to the VMC environment, with no opportunity to migrate/convert the database to something we could run in VMC or a native cloud provider. Since this is business continuity design exercise, every attempt must be made to mirror production. All x86 virtual systems will be replicated to the VMC environment, and the remaining system will sit in a co-location datacenter in the same region. Connectivity between the VMC environment and the co-location datacenter is accomplished by a direct connect which is assumed to be connected already..

Setting up the VMC environment.

Once logged into the VMC on AWS environment, select “View Details” on the SDDC to be connected to. Under the “Networking & Security” Tab, select “VPN” and then “Layer 2”. Select “Add VPN Tunnel”. In this case since we are going over a direct connect we chose the provided Private IP address, and our remote public IP was the termination of the direct connect at the colo.

After saving, expand the VPN and download the config, you will need this soon.  You will also want to take note of the “Local IP Address” for the VMC environment.  This can be obtained by clicking the info icon, and then copy the Local Gateway IP (Blocked here for security).

Next select “Segments” in the left panel and “Add Segment”. Enter a segment name that will make sense for the environment, set type to “Extended”, and select a tunnel ID, it must be unique to the extended segments in your VMC SDDC. 

NSX Edge deployment on-prem/colo

The remaining work will be done from the local or colo vcenter server.  Download the NSX-T Datacenter OVA, and begin the deploy process to your local vCenter.

Select Networks

At the “Select Networks” section, you need to determine your network topology.  In this case we are running VLAN’s on the dvSwitch, so each port is treated as an access port.  This becomes critical in the next screen.  For the sake of simplicity I have labeled the Port Groups as what they are used for.

Network 0 – For accessing the OVA’s cli and web management interface.

Network 1 – The management interface for the VPN.

Network 2 – This is the network where the layer 2 traffic will flow.

Network 3 – This is for HA traffic if you are running multiple edges for redundancy, not used in this case but still required.

Customize Template

Put in passwords and usernames as required until you come to the Manager area.  There is no NSX manager since we are deploying as an autonomous edge so skip everything except make sure you put a check in the Autonomous Edge.

Under network properties enter a hostname, and the management IP information.  This should be an IP on the Management network as above.

In the External section, as stated above, we are using VLANs at the portgroup level which effectively makes the port an access port, so in the box we need to make sure we set the VLAN to 0 and complete as below.  This is our uplink configuration so make sure you select eth1 in this case.

Ignore Internal and HA sections and the rest of the inputs, and select next, review, and then finish to deploy.

Configure the Autonomous Edge and Tunnel

When the NSX Autonomous edge has finished deploying, bring up the web interface and login as admin.  Select L2VPN and ADD SESSION, and fill in the fields.

Session Name – Input a name that makes sense.

Admin Status – Leave as Enabled.

Local IP – The external uplink IP we previously gave when installing the Autonomous Edge.

Remote IP – The Local Gateway IP we previously obtained from the VMC Environment.

Peer Code – This is found in the config file we previously downloaded, paste the text here.

Save and select PORT and Add Port, and fill in the fields

 Port Name – Input a name that makes sense (This is for the trunk so likely include that)

Subnet – Leave this blank

VLAN – 0 (Remember we are terminating the VLAN’s at the port group so these are access ports)

Exit Interface – eth2 (our trunk port)

Save and return to the L2VPN screen and select ATTACH PORT.

Session – Select the session we created previously

Port – Select the Port we just created.

Tunnel ID – this is the same as the Tunnel ID we created on the VMC on AWS side.

Once you attach the status should come up on both ends, and you are now connected.  For test purposes it is usually wise to put a test machine on each end of the tunnel, and run a few network tests.  This is not as common a use case, but it is helpful for environments where L2 tunneling is required.  

For more information please look at the documentation VMware publishes and the blog post I used as well while working on the solution.

VMware Documentation 

Configure an Extended Segment for the Layer 2 VPN

Install and Configure the On-Premises NSX Edge

Blog Post

Setting Up L2VPN in VMC on AWS

L2VPN in VMC on AWS

Starlink Beta: More Performance Updates

I will be posting a video on this in the next few days for anyone who wants to create this for themselves. Please keep an eye on my playlist on Starlink for more details. For now I wanted to get a quick performance update out.

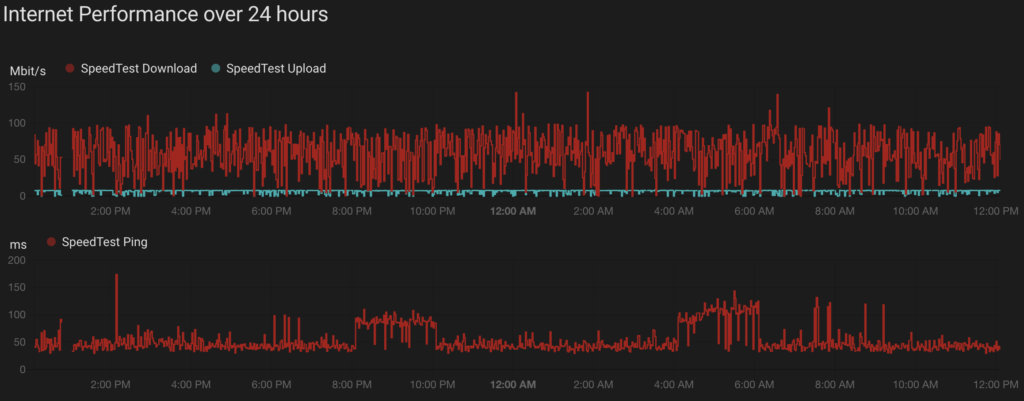
These graphs are all based on a history graph and gauge graphs from Home Assistant. In the youtube video coming out soon, I will show how to do this very quickly, and remotely. For reference, this is currently running the speed test every 1 min, after this post, I am going to adjust to run every 15 min to make the graph easier to read.

Here is a current, as of the writing of this, test. Not great but pretty good since I am still working on mounting and it is still sitting on my back porch.

Here is my dashboard for the past 24 hours. As you can see, performance is fairly solid, but what this does not show currently is the outages. It appears to randomly drop every few min to hours, which is likely due to the early stage of this test and will likely be resolved as more satellites are launched.

As always please comment if you have thoughts on testing, and check out my youtube channel for the latest videos. I will be posting more videos on how to create this monitor and plan to do some recordings of video calls, and statistics while streaming videos over Starlink to demonstrate the real world applications.

Starlink Beta: More Performance Updates

Starlink Beta: Happy New Year!

Nothing groundbreaking today, just wanted to post an update to the stats. More videos coming shortly here, https://youtube.com/playlist?list=PL3Bqge2W25PFufEOfS6dCvAsr5A7uTeMg.

Brief disclaimer on the stats. I have been busy working on some other projects, so the dish is still not mounted to the roof, it is sitting in my back yard, but I am still getting great performance for what it is.

Weekly Average (well really just a few days but whose counting) of the upload/download/latency.

24 hour graph every 1 min running speedtest-cli showing the speeds/latency.

I am working on a way to automate publishing these graphs daily to share so others can see them in real(ish) time. Stay tuned, and share with anyone you know who might be interested. This is really a community effort to help make internet access better for us all, so anything we can all do together to improve and provide better feedback is good for us all.

Starlink Beta: Happy New Year!

Starlink Beta: The Good, The Bad, And The Ugly

I was recently invited to join the closed beta for SpaceX Starlink satellite internet. Over the coming months, I plan to document what I learn, the good, the bad, and the ugly. I will also be posting videos when appropriate on my personal youtube channel. For full disclosure, I am not receiving any compensation for this, but I am an employee of VMware, will be using VMware products where relevant, I will do my best to remain agnostic where possible.

In order to appropriately test this solution, three variables are highly critical.

  • Download speed – How fast can you retrieve things from the internet, important for streaming television and music.
  • Upload speed – How fast can you send things out over the internet, particularly important for online gaming and video calls.
  • Latency – How long does it take traffic to make a round trip from you to your virtual destination and return, critical for voice, video, gaming, basically anything you want to do on the modern internet.

To set up the appropriate test environment I needed an isolated test network that would not impact my current production internet where my family works and plays, but also to be able to access that network securely to review the results. I also needed historical data on the performance as outlined above.

Remote Access

For the remote access, I initially set up port forwarding on my own personal router which I used to bypass the wifi-router that came with the Starlink beta. After testing, and contacting support, it was determined this is on the roadmap but not currently available. I then tried using publicly available cloud-based services for remote connectivity. This was acceptable, but much too slow, mostly due to issues on the Starlink side. I finally settled on leveraging my home wireguard VPN server and a wireguard client on a Linux server running on the Starlink network, effectively bridging the two networks with significant security restrictions, similar to the picture below.

The procedure to install and configure both the server and clients for wireguard can be found at https://www.wireguard.com/. I personally run the Linux Server Wireguard Docker image for my server.

In order to access the test network, I leave the VPN on the Starlink Test Linux Server always connected. I can then VPN into the local VPN server on the production network and then access the VPN interface of the Test Linux Server where I am running my graphing. When I have more time I will add the static routes to my firewall but for now this seems to work well.

Performance Monitoring

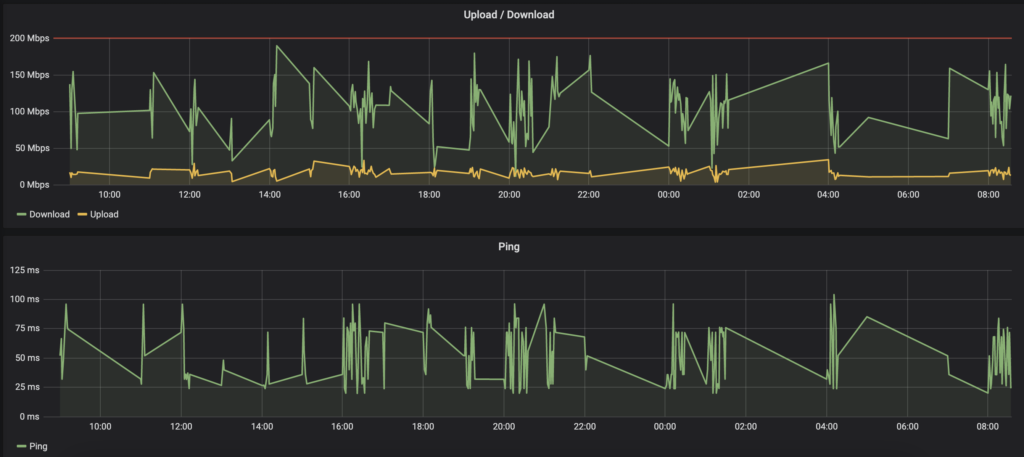
Performance monitoring over time was a particular challenge. My original thought was to leverage one of the speedtest CLI scripts, output to a CSV file, and use Python to display that in a website. After some research though and several failed tests, I discovered https://github.com/frdmn/docker-speedtest-grafana. This is far from a perfect solution, I have had it simply stop responding several times, forcing me to restart the docker containers, but for what I need, this is a perfect and simple solution. I deployed, and testing continues, but here are some raw outputs of the script running every 1 min for the past several hours.

As you can see, the latency does have some fairly big spikes, and the speed is pretty variable. I anticipate the speeds to increase latency to decrease as more satellites are launched, which appears to be happening quarterly or more often. I have noticed regular drops every hour or two for 1-3 min, I believe this is due to handoff between satellites, and I believe it will be resolved in the next few launches.

I will write up more of the testing, and post more videos as I find new and interesting things to show, but for now, this is a solid beta product. Some of my upcoming tests will include introducing software-defined WAN products to see if it helps with latency/jitter on the connection, and bonding connections to see if a slow but stable connection can help to smooth out some of the outages.

I firmly believe this is the future of connectivity and can make the world a better place by connecting more people and allowing those living in areas with less internet access to become more self-sufficient. The opportunities are there it is up to each of us to take them and to help each other do more great things.

Starlink Beta: The Good, The Bad, And The Ugly

What working from home means for your internet and wireless: Part 2

As we discussed in part 1, internet speeds, especially now, have become vital.  While we wait out this virus, adults are working from home, students are moving to a remote learning model and families are increasing streaming activity and online gaming and video chatting. The increased use of home internet makes the need for better quality home wireless more apparent.

For many families, the internet provider leases a modem with wireless access.  This works well if you live in a small house/apartment, with just a few wireless devices.  To paraphrase the Notorious B.I.G., “Mo Devices, Mo Problems”. As we add gaming systems, work computers, school computers, streaming devices, and then throw in a few smart home devices, well you can imagine the wireless system becomes a critical service.

Wireless coverage throughout the house is the key.  In the past, one centrally located device should support up to 50 connections.  This made sense when most of what we were connecting to our home wireless included a couple laptops, and maybe a streaming device or smart TV.  As we add smart doorbells, lighting, and other devices, strong signals become more important.  

Wireless extenders can help broaden the wireless coverage.  Basically, they join the existing network and retransmit the signal.  As with all radio signal retransmitting, there is some loss of signal strength, but this is a relatively inexpensive and simple option.

Mesh wireless is a relatively new concept to solve this problem.  The basic concept is you have several wireless devices, the first of the devices plugs into your “modem” (the device your internet provider gave you) and becomes the “router”.  The remaining device can connect via wired or wireless connection and extend the network. This is different from a traditional wireless extender since it is actually using a seperate network to “extend” the primary network so there is far less loss of speed.

For larger homes and home office/small business environments, a distributed wireless system may make more sense. Many small technology companies offer implementation and management of these professional grade environments, providing regular check ins, and updating the configuration as needed.

While we will be out of this “shelter in place” situation in the near future, this has brought to light the importance of having a solid plan in place for working from home, and having more family technology usage.  The best time to start planning is now, and when our culture returns to typical rhythms and routines, those who have improved their home and small business wireless systems will be ready for new opportunities to work, learn, and enjoy their time at home.

What working from home means for your internet and wireless: Part 2

What working from home means for your internet and wireless: Part 1

Working at home is becoming the new normal highlighting the need for dependable and responsive home internet and wireless.  In this series, we will look at some of the ways we can improve our working from home experience.

Wth an increasing number of knowledge workers being asked to work from home, many are finding what is generally acceptable for their regular use can’t hold up to video conferencing, e-mail, instant messaging, and file access. As schools and colleges move to distance learning, and several family members are accessing the wireless network at the same time, dependable and responsive home internet and wireless becomes critical.

Internet speed is one of the most well known metrics;  the one providers use to charge us for their service. More speed generally helps, especially as we have more users on our home networks. Most providers are now offering up to “Gig” service, which is blazingly fast. You are likely paying based on the download speed. Generally, home internet speeds range between 50Mbps and 1Gbps.

Without going into detail, that is how we measure the amount of data that can be downloaded from the internet. For a majority of usages this is the most important number. When working from home, sharing files with our colleagues, video calling, and “uploading” anything outside our home, the upload speed becomes critical. Because you are sending more traffic out, it doesn’t take long to overwhelm your connection.

Cable providers such as Comcast and Cox tend to have slower upload speeds, typically around 10Mbps, whereas fibre internet providers such as Verizon, AT&T, and Frontier tend to have similar speeds for both upload and download. If your co-workers are complaining of poor video performance from your video conference, your upload speeds may be the culprit.

Industry experts believe the work from home movement will continue beyond our current situation.  How will your home internet support your family’s needs now and in the future?

What working from home means for your internet and wireless: Part 1

Automating my home: Sprinkler Automation

rachio

When I first heard about sprinkler automation, I couldn’t conceive of a reason to invest more into a system that was pretty much hands off.  Our house has 5 zones mostly covering the backyard, and as pretty simple.  What finally sold me on the idea was my wife asking me to go into the garage to hit the rain delay when I was getting dressed for work one morning.  I started thinking about how silly it was that I had to go to all that effort just to shut down the sprinkler system for a day due to weather.  The final straw though was when I tried to change the programming.  I had thought my old home thermostat was painful to program, this made me want to give up on watering all together.

Doing a little research, I found out that our local water district will pay a substantial rebate for automated sprinkler systems.  I dug into why this was, and what the potential savings might be.  I found some systems with external sensors in ground to monitor the ground saturation, but the reviews on those were a bit troubling.  Many reviews stated they required constant recalibration, and it seemed the technology might be a little immature at this point.  For the most part, the mid range systems I was looking at all used local public weather station data to determine if they needed to run.  The interfaces were designed for smartphone users, very user friendly, and designed for family use.

Based on rebates, and ease of use, I took the plunge with the Rachio 2.  Setup was pretty simple, wiring it up was the toughest, just because I had a hard time getting the wires to seat.  Not any fault of the product, but my hands are too big to handle the low voltage wiring.  Joining the wireless was great, although I did typo my wifi password a couple times, but again, my own fault.  The configuration of zones was flawless, it walked me through the process, testing each zone, and then labeling it with a friendly name.  I was even able to take pictures of each zone and load them in.

As a bonus I was able to share the system with my wife.  Rather than logging in with a single account, I can give her access, and if I ever have a landscaper to keep up my yard, I can give them limited access to adjust as needed.  A small thing but pretty amazing they went to that level of detail.  Another nice touch is, it notifies me when it is watering, and it lets me know when it makes adjustments due to changing weather conditions.

All in all, I couldn’t be happier, and I would recommend if your water district offers a rebate, it is a no brainer.  Little improvements and quality of life gadgets like the Rachio 2 help manage our house, even when we aren’t there, and keep me from going out to the garage when I am half asleep to find the rain delay button.